Getting Device Location on iOS
This article explains how to obtain the user/device location using CoreLocation, Combine, and SwiftUI on iOS.
Overview
The following code snippet is the class responsible for getting the the user's location:
import Combine
import CoreLocation

class DeviceLocationService: NSObject, CLLocationManagerDelegate, ObservableObject {

    var coordinatesPublisher = PassthroughSubject<CLLocationCoordinate2D, Error>()
    var deniedLocationAccessPublisher = PassthroughSubject<Void, Never>()

    private override init() {
        super.init()
    }
    static let shared = DeviceLocationService()

    private lazy var locationManager: CLLocationManager = {
        let manager = CLLocationManager()
        manager.desiredAccuracy = kCLLocationAccuracyBest
        manager.delegate = self
        return manager
    }()

    func requestLocationUpdates() {
        switch locationManager.authorizationStatus {

        case .notDetermined:
            locationManager.requestWhenInUseAuthorization()

        case .authorizedWhenInUse, .authorizedAlways:
            locationManager.startUpdatingLocation()

        default:
            deniedLocationAccessPublisher.send()
        }
    }

    func locationManagerDidChangeAuthorization(_ manager: CLLocationManager) {
        switch manager.authorizationStatus {

        case .authorizedWhenInUse, .authorizedAlways:
            manager.startUpdatingLocation()

        default:
            manager.stopUpdatingLocation()
            deniedLocationAccessPublisher.send()
        }
    }

    func locationManager(_ manager: CLLocationManager, didUpdateLocations locations: [CLLocation]) {
        guard let location = locations.last else { return }
        coordinatesPublisher.send(location.coordinate)
    }

    func locationManager(_ manager: CLLocationManager, didFailWithError error: Error) {
        coordinatesPublisher.send(completion: .failure(error))
    }
}
And this is how the location can be accessed using the coordinatesPublisher:
deviceLocationService.coordinatesPublisher
    .sink { completion in
        print("Handle \(completion) for error and finished subscription.")
    } receiveValue: { coordinates in
        print("Handle \(coordinates)")
    }
See the Implementation and Usage sections for a thorough explanation of how the code works.
Implementation
Create a new file called DeviceLocationService.swift and add the following code:
import Combine
import CoreLocation

// 1
class DeviceLocationService: ObservableObject {

    // 2
    var coordinatesPublisher = PassthroughSubject<CLLocationCoordinate2D, Error>()

    // 3
    private init() {}
    static let shared = DeviceLocationService()

}
ObservableObjectallows SwiftUI to be notified when there are updates sent through the publishers.coordinatesPublisherwill be used to continuously send location coordinates or anErrorto the call site.- As opposed to using multiple instances of
DeviceLocationService, make it a singleton so only one class is attempting to retrieve location updates.
Make DeviceLocationService responsible for handling the CLLocationManagerDelegate methods:
// 1
class DeviceLocationService: NSObject, CLLocationManagerDelegate, ObservableObject {

...

    private override init() {
        super.init()
    }

...

    // 2
    private lazy var locationManager: CLLocationManager = {
        let manager = CLLocationManager()
        // 3
        manager.desiredAccuracy = kCLLocationAccuracyBest
        // 4
        manager.delegate = self
        return manager
    }()

    // 5
    func locationManager(_ manager: CLLocationManager, didUpdateLocations locations: [CLLocation]) {
        guard let location = locations.last else { return }
        coordinatesPublisher.send(location.coordinate)
    }

    // 6
    func locationManager(_ manager: CLLocationManager, didFailWithError error: Error) {
        coordinatesPublisher.send(completion: .failure(error))
    }
}
DeviceLocationServiceneeds to subclassNSObjectso it can conform toCLLocationManagerDelegate.CLLocationManageris the object responsible for delivering location-based events using a delegate.- You can choose from several constant values for the desired accuracy:
kCLLocationAccuracyBestForNavigation,kCLLocationAccuracyBest,kCLLocationAccuracyNearestTenMeters,kCLLocationAccuracyHundredMeters,kCLLocationAccuracyKilometer,kCLLocationAccuracyThreeKilometers, andkCLLocationAccuracyReduced. Keep in mind that higher accuracy will use more resources and drain the user's battery quicker. - Since
DeviceLocationServicenow conforms toCLLocationManagerDelegate, thelocationManagercan use it as the delegate for location updates. - The
didUpdateLocationsdelegate method will continuously be called by thelocationManagerand provide an array ofCLLocationobjects. The last location in the array will be used to send the coordinates usingcoordinatesPublisher. - In the event the
locationManagerfails, an error will be sent throughcoordinatesPublisherand will end any subscriptions.
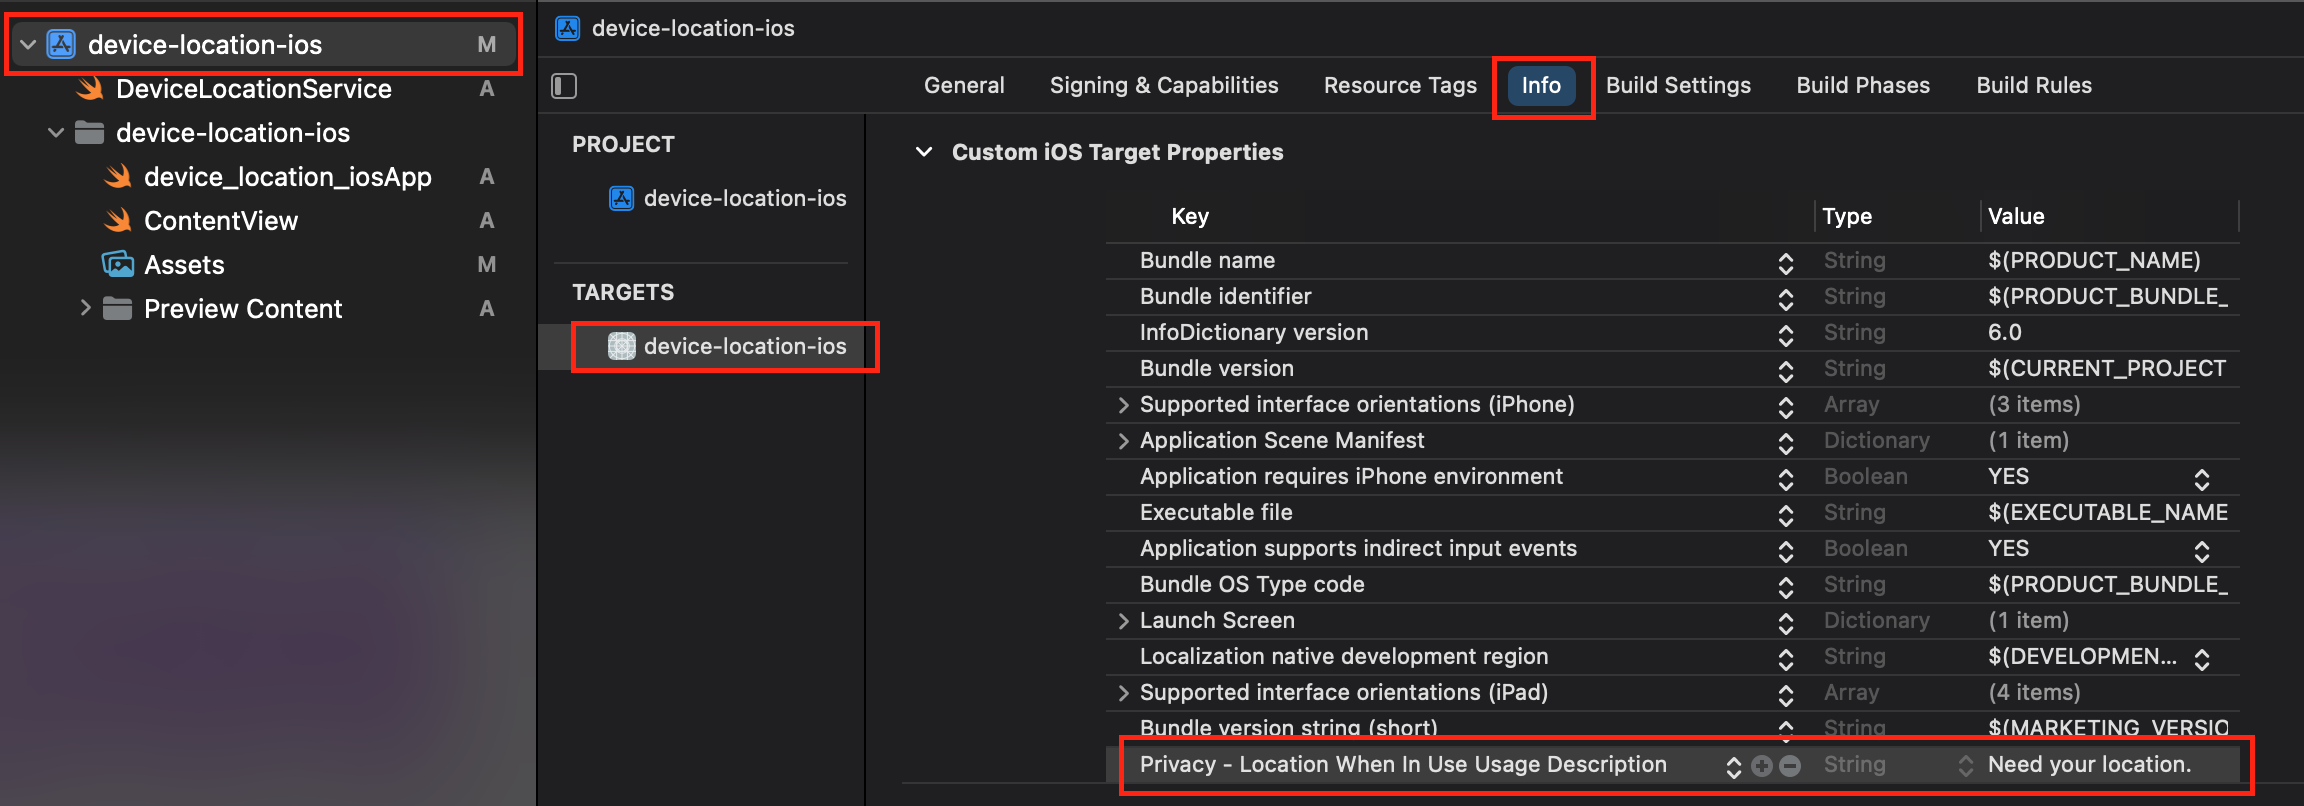
Add NSLocationWhenInUseUsageDescription or search for Privacy - Location When In Use Usage Description in the dropdown.

Create a publisher to handle the "Denied Location Access" state:
// 1
var deniedLocationAccessPublisher = PassthroughSubject<Void, Never>()
deniedLocationAccessPublisherwill be used to notify the app in the event that the user removes location access from Settings.
// 1
func requestLocationUpdates() {
    switch locationManager.authorizationStatus {

    case .notDetermined:
        locationManager.requestWhenInUseAuthorization()

    case .authorizedWhenInUse, .authorizedAlways:
        locationManager.startUpdatingLocation()

    default:
        deniedLocationAccessPublisher.send()
    }
}

// 2
func locationManagerDidChangeAuthorization(_ manager: CLLocationManager) {
    switch manager.authorizationStatus {

    case .authorizedWhenInUse, .authorizedAlways:
        manager.startUpdatingLocation()

    default:
        manager.stopUpdatingLocation()
        deniedLocationAccessPublisher.send()
    }
}
- Before attempting to get location updates, the authorization status needs to be determined. If it's not determined, then request permission. If access is granted, then start updating the location. In any other case, send a
Voidusing thedeniedLocationAccessPublisher. - This function will be called by the
CLLocationManagerwhen the authorization status is updated. Following similar logic torequestLocationUpdates, the location updates will either start or stop.
The DeviceLocationService class is ready to be used in the app to provide location updates.
Usage
In ContentView.swift add the following variables:
// 1
@StateObject var deviceLocationService = DeviceLocationService.shared

// 2
@State var tokens: Set<AnyCancellable> = []

// 3
@State var coordinates: (lat: Double, lon: Double) = (0, 0)
- Create a
@StateObjectvariable to access the shared instance ofDeviceLocationService. - Create a set to store the sinks that will be created to subscribe to the publishers in
DeviceLocationService. - Make a tuple to store the latitude and longitude without the need of importing CoreLocation for the
CLLocationCoordinate2Dtype.
Create two functions that can be used to observe the publishers of DeviceLocationService:
// 1
func observeCoordinateUpdates() {
    deviceLocationService.coordinatesPublisher
        .receive(on: DispatchQueue.main)
        .sink { completion in
            print("Handle \(completion) for error and finished subscription.")
        } receiveValue: { coordinates in
            self.coordinates = (coordinates.latitude, coordinates.longitude)
        }
        .store(in: &tokens)
}

// 2
func observeDeniedLocationAccess() {
    deviceLocationService.deniedLocationAccessPublisher
        .receive(on: DispatchQueue.main)
        .sink {
            print("Handle access denied event, possibly with an alert.")
        }
        .store(in: &tokens)
}
observeCoordinateUpdatesis responsible for setting up the subscription tocoordinatesPublisherand will update thecoordinatesproperty of theContentViewwith the values passed fromDeviceLocationService.observeDeniedLocationAccessobserves when location access has been denied so the user can be notified with an alert or some other UI of your choosing.
Lastly, update the body with the following code so the coordinates can be shown on screen:
var body: some View {
    // 1
    VStack {
        Text("Latitude: \(coordinates.lat)")
            .font(.largeTitle)
        Text("Longitude: \(coordinates.lon)")
            .font(.largeTitle)
    }
    // 2
    .onAppear {
        observeCoordinateUpdates()
        observeDeniedLocationAccess()
        deviceLocationService.requestLocationUpdates()
    }
}
- For simplicity, the coordinates are simply being shown on screen using
Textviews in aVStack. - Use
onAppearto perform all the required function calls as soon as the app starts up.
Build and run. You should now be receiving location updates 📍
